Today we will be dealing with the Java Web Start technology. This technology allows one to load applications (also applets) with the browser from server and run them on client machines without any installation, like applets.
However, like the applets, the Java Web Start applications have certain security issues. By default, they cannot access the client file system or download a document from any remote location different from the server they came in. In the second part of this lab we will learn how to sign the applications/applets to give them more permissions.
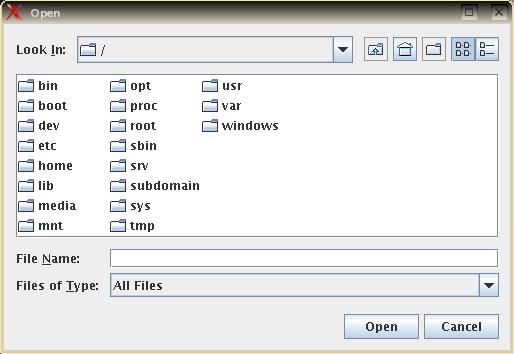
The JFileChooser component opens a dialog window for browsing the file system and allows one to select a file or folder or other directory entry, see the image below. On a Windows host the look-and-feel might be slightly different, but similar.
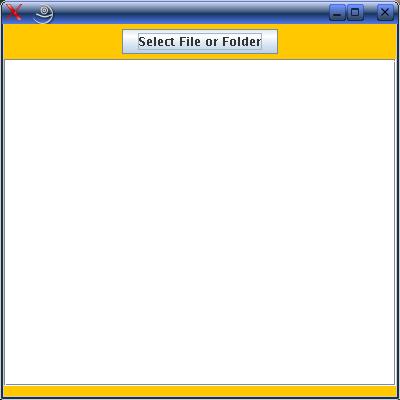
First, we design an application that pops up a small window like the one shown below. Upon clicking the button, the JFileChooser dialog will come up, offering the user to select a file. If the selected file is a folder, its contents will be displayed in the application's text area, one folder entry per line. If the folder entry is a text file, it contents will be displayed.
The application is designed as a single class consisting of 3 methods: main() (for creating the frame window), constructor method FileChooser1() for building the GUI, and actionPerformed() for opening the JFileChooser dialog and displaying the files and folders.
As you see, applications have an unrestricted access to the local file system and allow you to open basically every file (unless the file permissions do not allow this).
Do not trash your files. We will need them later in Parts III and IV of this lab.
The rest of the Lab will be done on the Linux system. We are going now to turn this application into an applet.
| public class FileChooser2 extends JApplet implements ActionListener |
| // position the frame in the middle of the screen |
till the end of the method.
| Main-Class: FileChooser2 |
The apply the following instruction:
| jar -cvfm FileChooser2.jar FileChooser2.mf FileChooser2.class |
|
<html> <body> <applet archive="FileChooser2.jar" code="FileChooser2.class" width="400" height="400"> </applet> </body> </html> |
| http://cs2.mcs.uwsuper.edu/~your_login/fileChooser.html |
Try to open the file chooser dialog. The JVM security manager does not allow you to do it.
What if we would try to launch somehow the above designed application over the network. Would it allow us then to browse the local file system?
Surprisingly, you are just several clicks away from launching the application designed in Part I over the network. Even more wonderful, is that no modification of the Java program is needed. This is possible due to the Java Network Launch Protocol (JNLP) that is supported by the Java plugin and most of the browsers. Change to your public_html folder.
| Main-Class: FileChooser1 |
| jar -cvfm FileChooser1.jar FileChooser1.mf FileChooser1.class |
|
<?xml version="1.0" encoding="ISO-8859-1"?> <jnlp spec="1.0+" codebase="http://cs2.mcs.uwsuper.edu/~your_login/" href="fileChooser.jnlp"> <information> <title>JFileChooser Demo</title> <vendor>CSCI 451</vendor> <description>File Chooser Application</description> </information> <resources> <j2se version="1.5+"/> <jar href="FileChooser1.jar"/> </resources> <application-desc main-class="FileChooser1"> </application-desc> <security> <all-permissions/> </security> </jnlp> |
Make sure to put your own valid login instead of your_login.
| http://cs2.mcs.uwsuper.edu/~your_login/fileChooser.jnlp |
Does not work? Your browser has to be configured for Java Web Start. You need to associate the application/x-java-jnlp-file MIME type with the javaws application (part of JRE). The configuration should be automatic after installing the JDK. If not, in the Firefox browser open the Edit -> Preferences menu and click on Downloads icon. Click the button View and edit Actions... in the Download Actions section. Make sure the following entry is set in the Actions table:
| Extension | File Type | MIME Type | Action |
|---|---|---|---|
| JNLP | JNLP file | application/x-java-jnlp-file | PATH_TO_JAVAWS/javaws(.exe) |
As you see, no matter that we attempted to grant all permissions to the application, a perfectly working earlier program cannot read the local file system any more.
BTW: the created JAR file is self-running. You can apply the following command:
| java -jar FileChooser1.jar |
Moreover, most windows managers are by default configured so, that just clicking on this file will automatically run it. Try it on Windows.
To overcome the difficulty of gaining the access to the local file system from the Web applications, we will need somehow to offer the user to "trust" the applet/application source and allow it to run under the same permissions as the locally installed software. This is done in a two-step process: issuing a certificate and signing your applet/Web application with this certificate.
The JDK comes with the keytool program, which is a command-line tool to generate and manage a set of certificates. This program manages the keystores - databases of certificates and private keys. Each entry in the keystore is an alias. We are going to create a keystore named csci451.store and assign with it the alias csci451. For this, just apply the following instruction:
| keytool -genkey -keystore csci451.store -alias csci451 |
When generating a key, you will be prompted with the following information. The user input is highlighted. I encourage you to use a more sophisticated password than just "123456", which you should remember.
|
Enter keystore password: 123456 What is your first and last name? [Unknown]: put your name What is the name of your organizational unit? [Unknown]: CSCI 451 What is the name of your organization? [Unknown]: SW1017 What is the name of your City or Locality? [Unknown]: Superior What is the name of your State or Province? [Unknown]: Wisconsin What is the two-letter country code for this unit? [Unknown]: US Is CN=Sergei Bezrukov, OU=csci451, O=SW1017, L=Superior, ST=Wisconsin, C=US correct? [no]: y Enter key password for csci451 (RETURN if same as keystore password): just hit Enter |
This results in a file csci451.store which will be used by the next command to sign your application by using the jarsigner tool (included in JDK):
| jarsigner -keystore csci451.store FileChooser1.jar csci451 |
This will produce the following dialog, where the password is the one that you have used by creating the keystore:
|
Enter Passphrase for keystore: 123456 Warning: The signer certificate will expire within six months. |
You are done! Load the following URL in your Web browser:
| http://cs2.mcs.uwsuper.edu/~your_login/fileChooser.jnlp |
You will get a similar window, depending on the look-and-feel installed on your system:
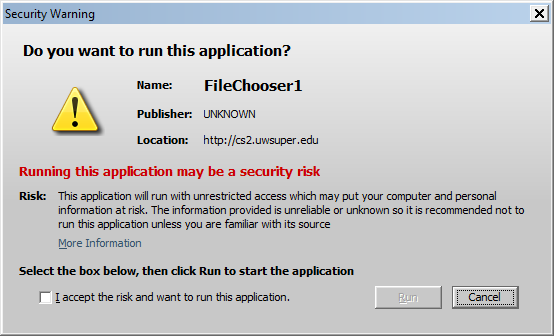
There is nothing wrong with our application signing. Simply the browser is not aware on the issuer of this signature. To get rid of this message, you will need to sign your application by a trusted agency (e.g., VeriSign), recognized by the browsers. This, however, is costly, think twice before doing this. For now, just check "I accept the risk", click the "Run" button and enjoy.
You can now sign your applet JAR file FileChooser2.jar. For this you can use the keystore database created above. Just apply the following instruction:
| jarsigner -keystore csci451.store FileChooser2.jar csci451 |
After entering the password you have used before, the JAR file will get signed. Clear the browser cache from the JavaConsole tool and load the following URL in your browser:
| http://cs2.mcs.uwsuper.edu/~your_login/fileChooser.html |
You might be asked again to confirm running the application. Click "Run" and enjoy.
That's all, Folks. Of course, what we have done today is far not the most secure way to run the web applications/applets. JVM allows a much more flexible way to control the security manager, and issue restricted file reading/writing permissions, which is sufficient for most applications. However, we do not have time to study this in detail in our course.