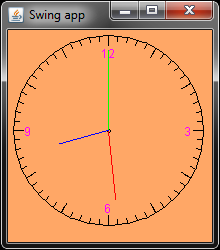
Your task today is to design an analog clock application similar to the one shown below. You will learn how to get and set up current time and make the clock working.
This part of the lab is devoted to the design of a static clock display similar to the one shown below. The clock won't work yet. We will add the functionality to this application in the second part of this lab.
The entire Clock project consist of three classes borrowed from the Swing Template. Class SwingApp is used for the initialization purposes, while the class DrawPanel is used for drawing.
We use the class variable private DisplayPanel clock although it is used just in the only method of this class. This is done for a later development of this class, when another method using this class variable will be added.
This class has three members hours, minutes, and seconds to set up the clock. These variables will be later initialized and updated by the methods of class Clock, so we set the (default) package access specifier for them. For now, we just initialize these variables with some (legal) values to display static time.
int rClock = 95; // clock radius int rNumbers = 85; // number radius int rHourHand = 50; // hours arm length int rMinHand = 70; // minutes arm length int rSecHand = 80; // seconds arm length |
|
g.setColor(Color.black); g.drawOval(100 - rClock, 100 - rClock, 2*rClock, 2*rClock); |
|
int width1 = g.getFontMetrics().stringWidth("0"); int width2 = g.getFontMetrics().stringWidth("00"); int height= g.getFontMetrics().getHeight(); |
g.setColor(Color.magenta);
g.drawString("12", (int)(100 - width2/2.0),
	   (int)(100 - rNumbers + height/2.0));
g.drawString("6",  (int)(100 - width1/2.0),
	   (int)(100 + rNumbers + height/2.0));
g.drawString("9",  (int)(100 - rNumbers - width1/2.0),
	   (int)(100 + height/2.0));
g.drawString("3",  (int)(100 + rNumbers - width1/2.0),
	   (int)(100 + height/2.0));
|
|
Now, if r is the seconds arm radius, then the coordinates of its endpoint p are (r · cos(α), r · sin(α)) (assuming that the origin is in the center of the circle). To compute sin(α) and cos(α) one needs to convert the angle from degrees to radians by using the formula
Finally, moving the origin from the center of the circle to the top left corner of the app area leads to the formulas
Here we assume that the app size is 220x250 pixels, so the constant 100 is used for translation of the origin. Hence, one gets the following code to draw the seconds arm:
g.setColor(Color.green); double angle = (90 - seconds*6.0)*Math.PI/180; g.drawLine(100, 100, (int)(100 + rSecHand*Math.cos(angle)), (int)(100 - rSecHand*Math.sin(angle))); |
g.setColor(Color.red); angle = (90 - minutes*6.0)*Math.PI/180; g.drawLine(100, 100, (int)(100 + rMinHand*Math.cos(angle)), (int)(100 - rMinHand*Math.sin(angle))); |
g.setColor(Color.blue);
      angle = (90 - (hours + minutes/60.0)*30.0)*Math.PI/180;
      g.drawLine(100, 100, (int)(100 + rHourHand*Math.cos(angle)),
                           (int)(100 - rHourHand*Math.sin(angle)));
|
g.setColor(Color.black);
      g.fillOval(100 - 3, 100 - 3, 6, 6);
|
Now you are ready to compile the project. Make sure that it looks "nice".
| import java.util.Calendar; |
Calendar cal = Calendar.getInstance(); clock.hours = cal.get(Calendar.HOUR); clock.minutes = cal.get(Calendar.MINUTE); clock.seconds = cal.get(Calendar.SECOND); |
We use the class Timer of package javax.swing. The constructor of this class takes two parameters: the number of milliseconds between the timer events, and the class name to respond on the timer events. We make our app be the listener for the timer events and use the keyword this for the reference to the SwingApp class.
Timer timer = new Timer(1000, this); timer.start(); |
The method start() starts the timer. From now on, the method actionPerformed() will be called every 1000 milliseconds (=1 second), the time interval between two consecutive clock updates.
| import java.awt.event.*; |
| class SwingApp extends JFrame implements ActionListener |
public void actionPerformed(ActionEvent e)
{
   clock.seconds++;
   if (clock.seconds == 60)
   {
      clock.seconds = 0;
      clock.minutes++;
      if (clock.minutes == 60)
      {
         clock.minutes = 0;
         clock.hours++;
         if (clock.hours == 24)
            clock.hours = 0;
      }
   }
   clock.repaint();
}
|
Try to do as much as you can in the lab.